Discussion:
Motors rely on electromagnetism. All motors have 3 things in common, a coil, a magnet, and an electromotive force that causes the current to move. Most motors are used to move things such as wheels on cars and fans in refrigerators. While your motor will not be hooked up to another object, the coil itself will move.
Purpose:
The purpose of this activity is to construct an on-off motor that actually
spins continuously for at
least 30 seconds.
Materials: 4 alligatore clips, 2 banana end wires, 1 tin can, 3 pieces of 40 cm long wire stripped at each end, 4 D size batteries, battery holder, a 15 cm long piece of thread, two or more magnets, 2 paper clips, tape, magnetic field sensor,USB link, computer with DataStudio
Procedure:
Determine the I in your loop:
1) Strip or sand the end of each of your wires. You only need to strip or sand about 3 cm worth of the end.
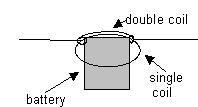
2) Coil one wire around a single D cell battery so as to make a loop. Carefully uncoil the ends and wrap them through the coil so that 1/3 of the loop is a double wire and 2/3 of the loop is a single wire This is the most important part of the motor and needs to kept as best as possible as a perfect circle with arms going straight out to the sides.
3) Connect the magnetic sensor to the computer. When prompted, choose create new experiment.
4) In the setup window, go to sampling options and choose "keep". Click off "Enter a keyboard value when data is kept". This will automatically turn off the other box.
5) Set up digital meters for gauss. Set up a table with gauss. No graph is needed for this experiment.
6) Place all 4 batteries in the battery holder. Connect the loop to one battery. Leave one part disconnected until ready for measurements as this will get hot and use the battery up quickly if left connected for too long.
7) Place the magnetic sensor in the middle of the coil. Make sure the sensor is perpindicular to the coil and right in the cener. The coil can lie flat on the counter and the sensor can touch the counter as well.
8) When ready, connect the circuit and push start and then keep when measurements appear stable. Repeat by connecting to two batteries, then three, and then four. This will give you four data values for your table. After the fourth point, press the stop button.
9) Repeat for a total of THREE trials.
10) Print the data table. Add a column and for the average of all three trials and calculate the average.
11) Measure and record the radius of your loop.
12) Using the equation for a B field of a loop, the radius of your loop, and the value of 1 1/2 for N, determine the current in the wire for each number of batteries. Add this column to your table as well. (5-step calculation)
Determine the minimum number of batteries required to make your motor turn:
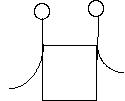
13) Make a small loop at one end of two remaining wires by wrapping the wire around a pencil end
and twisting the wire together.
![]()
14) Tape the wires onto the sides of your tin can. The unlooped ends should be just hanging free so they can connect to your batteries.

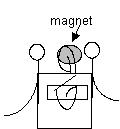
15) Unfold the paper clips once and tape one on each side of the tin can. Attach a magnet to each paper clip so that their N and S ends face each other (check that they attract). The magnets and loops should be at the same level.
16) Measure the B field inbetween the magnets and record value.
17) Mass your loop. Record this value.
18) Determine what force must be equal to the weight of your loop then set up an equality to determine the minimum value of I that is required to make the loop just start to move. Remember, one side is being pushed down while the other side is being pushed up. The length of the wire will be half the circumference for each side. The B field is from the magnets. (5-step)
19) Determine the minimum number of batteries required and start with that number of batteries for the next part. (note: of calculation shows can't get enough I, try adding more magnets and remeasure B field and calculate)
Make your motor spin for 30 seconds: (everything should be disconnected from the first part of this experiment)
20) Tie a small piece of thread to your loop next to one of the arms coming out. Wrap the thread 2 or 3 times around the arm and then tape the end of the string to the end of the wire (It should look like a silver and white candy cane).

21) Place the ends of the coiled wire through the loops of the wire taped on the tin can. THE LOOP IS THE MOST IMPORTANT PART...IT MUST BE AS CLOSE TO A PERFECT CIRCLE WITH STRAIGHT END WIRES AND NO SAGGING IN THE MIDDLE OR IT WON'T WORK!. Make sure the ends of the bare wire touch the exposed wired loops.
22) Hook up the two free end wires of the looped wire to the minimum number of batteries. Kick start your motor by blowing on it or giving it a LITTLE nudge. If it moves and gets stuck, readjust the loop so that it is not closer to one magnet than another. If it doesn't move at all and just hangs there, fix your loop so that its ends are straight and it doesn't sag. BE CAREFUL, the wires will get HOT if you leave them connected for too long! If it still doesn't work, try adding another battery to the circuit. Record the number of batteries actually required.
23) Your teacher must see the motor turning for 30 seconds and the group must explain how it works. (Hint: what does the thread and gravity do??)
24) Calculate the magnetic moment of your loop. (5-step)
Conclusion: (RERUN) Include relationship between B and I, comparison of calculated number of batteries to actual number of batteries required, and how the motor actually works.